Platform Customization
- Compiler Directives
- Calling Kotlin and Java API
- Compose Integration
- Model Integration
- Android Context
- iOS and Android Libraries
- Skip Comments
- Kotlin and Java Files
- Working in Android Studio
Whether to work around limitations in Skip’s Android support, differentiate your iOS and Android experiences, take advantage of OS-specific features, or simply because you prefer to write parts of your app separately for each platform, you will likely find yourself wanting to write iOS-only or Android-only code. Skip makes this easy.
Compiler Directives
The most common and convenient mechanism for writing iOS or Android-only code is conditional compiler directives. You probably already use these in your Swift. For example:
#if DEBUG
…
#else
…
#endif
Use the os(Android) condition to create blocks of code that are only compiled into your iOS or Android app. The following code blocks would all print “Android” on Android and “iOS” on iOS:
#if os(Android)
print("Android")
#endif

#if !os(Android)
print("iOS")
#endif


#if os(Android)
print("Android")
#else
print("iOS")
#endif
You can also use compiler directives in SwiftUI modifier chains:
Text("Hello World")
    #if os(Android)
    .italic()
    #else
    .bold()
    #endif
Calling Kotlin and Java API
As we have seen, os(Android) blocks allow you to easily customize your code path for Android. But Skip also recognizes another conditional symbol: SKIP. And this symbol unlocks a Skip superpower: the ability to directly call Kotlin and Java API. Consider the following code:
func printFormatted(time timeInMills: Int64) {
    #if os(Android)
    let formatted = androidTimeString(milliseconds: timeInMills)
    #else
    let formatted = … iOS code path …
    #endif
    print(formatted)
}

#if SKIP
func androidTimeString(milliseconds: Int64) -> String {
    let dateFormat = java.text.SimpleDateFormat("yyyy-MM-dd'T'HH:mm:ss'Z'", java.util.Locale.getDefault())
    dateFormat.timeZone = java.util.TimeZone.getTimeZone("GMT")
    return dateFormat.format(java.util.Date(milliseconds))
}
#endif
What is going on here?
- The
printFormattedfunction uses#if os(Android)to callandroidTimeString(milliseconds:)in the Android build. androidTimeString(milliseconds:)is defined within a#if SKIPblock. All code within#if SKIPblocks is transpiled to Kotlin. So while this looks like Swift code, it becomes Kotlin code during the Android build process. That means it can call any other Kotlin or Java API naturally, just as if the API were written in Swift. Here we use various Java date formatting functions.- Skip automatically bridges all of the non-private code in your
SKIPblocks so that you can interact with it from your compiled Swift.
You are not required to use fully-qualified type names. Skip allows you to import Kotlin and Java packages so that you can use unqualified names. See the documentation on dependencies.
While the example above is rather contrived, consider the broader implications. You can use this mechanism to directly interact with any Android libraries, including third-party dependencies or your own custom Kotlin. The ability so easily utilize both iOS-only and Android-only APIs - right inline - differentiates Skip from many other cross-platform solutions, where calling platform-native code can be difficult. Later, we’ll see how to take advantage of this to mix SwiftUI and Compose views.
If you are using Skip Lite, all of your Swift is transpiled, so you can use #if SKIP and #if os(Android) interchangeably.
Syntax
When you call Kotlin and Java code from within transpiled #if SKIP blocks, remember that you are still writing in Swift. The code is still parsed by Xcode, so it must have valid Swift syntax. But it is excluded from your iOS build and invisible to the Swift compiler, which allows it to make any syntactically valid API call without causing Xcode errors. Just write natural Swift code, and imagine that the Kotlin or Java API you’re calling is a Swift library API. Skip’s transpiler will take care of the rest.
If you’re attempting to cut and paste Kotlin inline, you’ll have to turn it into valid Swift to avoid syntax errors. Luckily, the languages are extremely similar. You’ll typically only have to change a few calling conventions:
- Named parameter values in Kotlin are specified with an equals (
=) sign, whereas in Swift they use a colon (:). Note that parameter names are never required in Kotlin. - Closure arguments in Kotlin are specified by an arrow (
->), whereas in Swift they use theinkeyword. - To import everything in a Kotlin package, use
import com.xyz.__rather thanimport com.xyz.*. The latter is not valid Swift.
For example, the following Kotlin:
val start = 1
var result = 0
for (i in 1 until 10) {
    result += someFunction(value = start + i, block = { arg -> arg + 1 })
}
Would use the following syntax when embedded in a Swift #if SKIP block:
let start = 1
var result = 0
for i in 1..<10 {
    result += someFunction(value: start + i, block: { arg in arg + 1 })
}
Complex Types
You may want to pass complex data types back and forth between your compiled Swift and transpiled code in your #if SKIP blocks, as well as between your transpiled Swift and various Kotlin and Java APIs.
In order to pass types in and out of transpiled #if SKIP functions, those types must be bridged. Many common types support bridging out of the box, and bridging your own types is often a simple matter of annotating them. See the bridging documentation for details.
Passing complex data back and forth to Kotln API is typically easy, because the Skip transpiler unifies the Swift and Kotlin type systems. When Skip does use bespoke types to represent common data structures, though, we have standardized on a simple method for converting these types to their Kotlin equivalents:
.kotlin(nocopy: Bool = false): Skip implements this function for its Swift types on Android to return the equivalent standard Kotlin object. For example, when your Swift code uses anArray, Skip’s transpiled output usesskip.lib.Array, a Skip type designed to mirror the API and value semantics of Swift arrays. CallingsomeArray.kotlin()returns akotlin.collections.Listcontaining the same elements. By default, Skip returns a copy which also recursively invokes.kotlin()on each element. You can use the optionalnocopyparameter to hint that this is not necessary. In that case, Skip will return theArray’s backingListinstance directly if possible.
Here is an implementation of this function for Calendar in the SkipFoundation transpiled package. Note that SkipFoundation’s Calendar uses an internal platformValue member of type java.util.Calendar to take advantage of Java’s existing calendaring functionality.
#if SKIP
extension Calendar: KotlinConverting<java.util.Calendar> {
    public func kotlin(nocopy: Bool = false) -> java.util.Calendar {
        return nocopy ? platformValue : platformValue.clone() as java.util.Calendar
    }
}
#endif
Again, the .kotlin() function is only needed when passing builtin types with different representations to Kotlin and Java API. It isn’t needed for basic types like Int or String, and types that you define yourself can directly implement Kotlin or Java protocols.
Types that provide custom .kotlin() conversion functions also provide a constructor that accepts their Kotlin form, should you need to convert from the Kotlin type back to the Swift equivalent. To build on the example above, SkipFoundation’s Calendar has an init(platformValue: java.util.Calendar) constructor.
Compose Integration
Skip’s SwiftUI implementation includes additional API that allows you to move fluidly between SwiftUI and pure Compose code. This powerful capability is useful for several reasons:
- If you prefer to code portions of your app entirely in Compose, Skip’s interoperability allows you to share as much or as little of your UI as you like between the platforms, without worrying about fighting the framework. You can add Kotlin libraries and include Kotlin files full of custom Kotlin and Compose functions that you call using the techniques in this chapter.
- Easily embed Android-specific UI components and access Android-specific features from anywhere in your app.
- Skip hasn’t yet implemented every SwiftUI API for Android. Being able to trivially mix Compose views into your UI enables you to work around any of Skip’s temporary shortcomings.
The MapView example below uses Apple Maps on iOS and Google Maps on Android. To embed Google Maps, it utilizes Skip’s Android-only ComposeView, which is a native SwiftUI wrapper around a transpiled ContentComposer. For a detailed discussion of embedding Compose in SwiftUI and vice versa, see the ComposeView topic in the SkipUI module.
import SwiftUI
import MapKit

struct MapView : View {
    let latitude: Double
    let longitude: Double

    var body: some View {
        #if os(Android)
        // on Android platforms, we use com.google.maps.android.compose.GoogleMap within in a ComposeView
        ComposeView { MapComposer(latitude: latitude, longitude: longitude) }
        #else
        // on Darwin platforms, we use the SwiftUI Map type
        Map(initialPosition: .region(MKCoordinateRegion(center: CLLocationCoordinate2D(latitude: latitude, longitude: longitude), span: MKCoordinateSpan(latitudeDelta: 0.1, longitudeDelta: 0.1))))
        #endif
    }
}

#if SKIP
import com.google.maps.android.compose.__
import com.google.android.gms.maps.model.CameraPosition
import com.google.android.gms.maps.model.LatLng

struct MapComposer : ContentComposer {
    let latitude: Double
    let longitude: Double

    @Composable func Compose(context: ComposeContext) {
        GoogleMap(cameraPositionState: rememberCameraPositionState {
            position = CameraPosition.fromLatLngZoom(LatLng(latitude, longitude), Float(12.0))
        })
    }
}
#endif
Skip also provides Android-specific SwiftUI API that allows you to customize Skip’s underlying Compose components. Read more in the SkipUI module’s Material documentation.
Model Integration
Skip ensures that the @Observable types you define in your shared Swift business logic can power your Compose UI as well, as described in the Development chapter. Transparent model integration is an additional way that Skip allows you to move seamlessly between shared and platform-specific code.
In Skip Lite, AsyncStream also features deep Kotlin integration. You can construct an AsyncStream from a Kotlin Flow, and you can retrieve a Flow from an AsyncStream using the standard .kotlin() function.
Android Context
Many Android system calls require a Context or Activity reference.
Skip Fuse
SkipFuse and SkipFuseUI provide Swift extensions to retrieve these references for compiled Skip Fuse code:
import SkipFuse

#if os(Android)
let applicationContext = ProcessInfo.processInfo.dynamicAndroidContext()
if let packageName: String = try? applicationContext.getPackageName() {
    …
}
…
#endif
import SwiftUI

#if os(Android)
if let activity = UIApplication.shared.dynamicAndroidActivity() {
    …
}
#endif
These Android objects are returned to your native code as AnyDynamicObject subclasses. Learn more about AnyDynamicObject here.
Skip Lite
Similarly, SkipFoundation and SkipUI provide Swift extensions to retrieve these references in transpiled Skip Lite code:
import Foundation

#if SKIP
let applicationContext = ProcessInfo.processInfo.androidContext
let packageName = applicationContext.getPackageName()
…
#endif
import SwiftUI

#if SKIP
if let androidActivity: androidx.appcompat.app.AppCompatActivity = UIApplication.shared.androidActivity {
    let intent = androidActivity.getIntent()
    …
}
#endif
iOS and Android Libraries
In addition to Skip’s own dual-platform libraries, thousands of Swift packages are available for Android. You can use these packages in your Skip Fuse app just as you would in an iOS-only app. To learn how to integrate iOS-only or Android-only dependencies, however, read the Dependencies documentation chapter.
Skip Comments
Skip treats any // or /* */ comment line beginning with “SKIP” as a build instruction. Skip supports several instructions, all of which influence Skip’s output or behavior.
-
SKIP <Attributes>This instruction applies Skip-specific attributes to the target element. Skip currently recognizes five attributes:@nocopy,@nodispatch,@bridge,@bridgeMembers, and@nobridge. See the Struct transpilation topic for an explanation of@nocopy. Use@nodispatchon a transpiled async function to prevent Skip from inserting Kotlin to run it on aDispatcher.@bridge,@bridgeMembers, and@nobridgehelp control what API is bridged between your compiled Swift and Kotlin.// SKIP @bridge struct S { … } -
SKIP DECLARE: <Kotlin>Replace the target declaration with custom Kotlin in transpiled code. This is useful to customize how a type, function, or property is declared in Kotlin, without affecting the transpilation of its body.// SKIP DECLARE: override fun SaverScope.save(value: Any): Any? override func save(value: Any) -> Any? { … } SKIP EXTERN: Denote an external native function in transpiled code. This instruction is used in C integration.-
SKIP INSERT: <Kotlin>Insert arbitrary Kotlin into transpiled code.// SKIP INSERT: var count by remember { mutableStateOf(100) } var countString = count.description -
SKIP NOWARNPlace this comment on the offending line to silence a Skip warning or error.// SKIP NOWARN let dict = obj as? Dictionary<Int, String> -
SKIP REPLACE: <Kotlin>Replace the target statement with arbitrary Kotlin in transpiled code. UnlikeSKIP DECLARE, this includes the body.// SKIP REPLACE: // fun printOS() { // print("Android") // } public func printOS() { print("iOS") } SKIP SYMBOLFILEThis instruction is used at the top of a transpiled Swift source file. It tells Skip that the file should only be used to gather symbols about declared API. Skip expects that you will implement the API with a corresponding Kotlin file. In effect, it turns the Swift source into a header file. SkipLib uses this technique extensively to implement aspects of the Swift standard library in Kotlin.
Instructions that specify Kotlin code can span multiple comment lines. Skip assumes that the instruction’s Kotlin continues until Skip sees one of:
- A new instruction
- A blank comment line
- The end of the comment block
Thus, this:
// SKIP INSERT: var count by remember { mutableStateOf(100) }
And this are both valid:
// SKIP INSERT:
// var count by remember {
//     mutableStateOf(100)
// }
Kotlin and Java Files
The mechanisms covered so far allow you to use Kotlin and Java API from Swift or to embed bits of pure Kotlin within your transpiled Swift source. But Skip also allows you to include entire Kotlin and Java source files in your Xcode project. Simply use the standard .kt and .java extensions and place your source files into the Sources/<ModuleName>/Skip directory alongside your skip.yml file. Skip will include them in the resulting Android build. SkipLib uses this technique to implement aspects of the Swift standard library in Kotlin.
When working on Kotlin and Java files, we typically prefer to open the generated Android project in Android Studio to take advantage of its syntax highlighting, autocompletion, and other niceties. In fact, you could have a dedicated Android team working to extend and customize the Android version of your app using Android Studio, while other teams work on the iOS and shared portions of the codebase.
Kotlin Package Names
Skip transforms your CamelCase Swift module names into dot-separated lowercase Kotlin package names:
MyPackagebecomesmy.packageMyHTTPLibrarybecomesmy.http.library- Kotlin package names must have at least two segments, so
Productbecomesproduct.module
Skip also removes the Tests suffix from module names during translation, so that your tests and source end up in the same Kotlin package. Kotlin does not have an equivalent of Swift’s @testable attribute, so this is the only way to allow your tests to access internal module API.
To avoid having to explicitly import your Kotlin and Java API when using it in your #if SKIP blocks, set the package name of your Kotlin and Java files to the derived package name of your Swift module. For example, if you are including the file Sources/MyCoolApp/Skip/CustomKotlin.kt, the package header should be package my.cool.app.
Working in Android Studio
Skip generates a complete gradle project from your dual-platform app or framework. You can open this project in Android Studio. This is often useful to debug Android-specific issues and unit tests or iterate on your Kotlin files.
Setup
By default, Xcode and Android Studio build to different locations: Xcode uses DerivedData, while Android Studio uses a .build folder in your project directory. This won’t affect you if you’re building and running only from one IDE or the other, but it can be problematic if:
- You want to be able to build and run the same output from both Xcode and Android Studio, moving back and forth between the two.
- You’re using an Xcode Workspace to iterate on local copies of SwiftPM dependencies alongside your app. Android Studio won’t see your Workspace copies, and instead will always use the dependency sources defined in
Package.swift.
If you’d like to share the same build location, you can do so by pointing Android Studio at Xcode’s DerivedData location for your project. Edit your project’s Android/settings.gradle.kts file to un-comment the line setting the BUILT_PRODUCTS_DIR system property, and specify the path to your project’s Debug-iphonesimulator folder. The result should look something like:
pluginManagement {
    // Initialize the Skip plugin folder and perform a pre-build for non-Xcode builds
    val pluginPath = File.createTempFile("skip-plugin-path", ".tmp")

    // overriding outputs for an Android IDE can be done by un-commenting and setting the Xcode path:
    System.setProperty("BUILT_PRODUCTS_DIR", "${System.getProperty("user.home")}/Library/Developer/Xcode/DerivedData/MySkipProject-aqywrhrzhkbvfseiqgxuufbdwdft/Build/Products/Debug-iphonesimulator")

    …
You can open the DerivedData folder from the Locations tab of Xcode’s Settings. Then navigate to your project’s Debug-iphonesimulator folder. After opening settings.gradle.kts in Xcode, drag the folder onto the open Xcode window to insert the file path.
Dual-Platform Apps
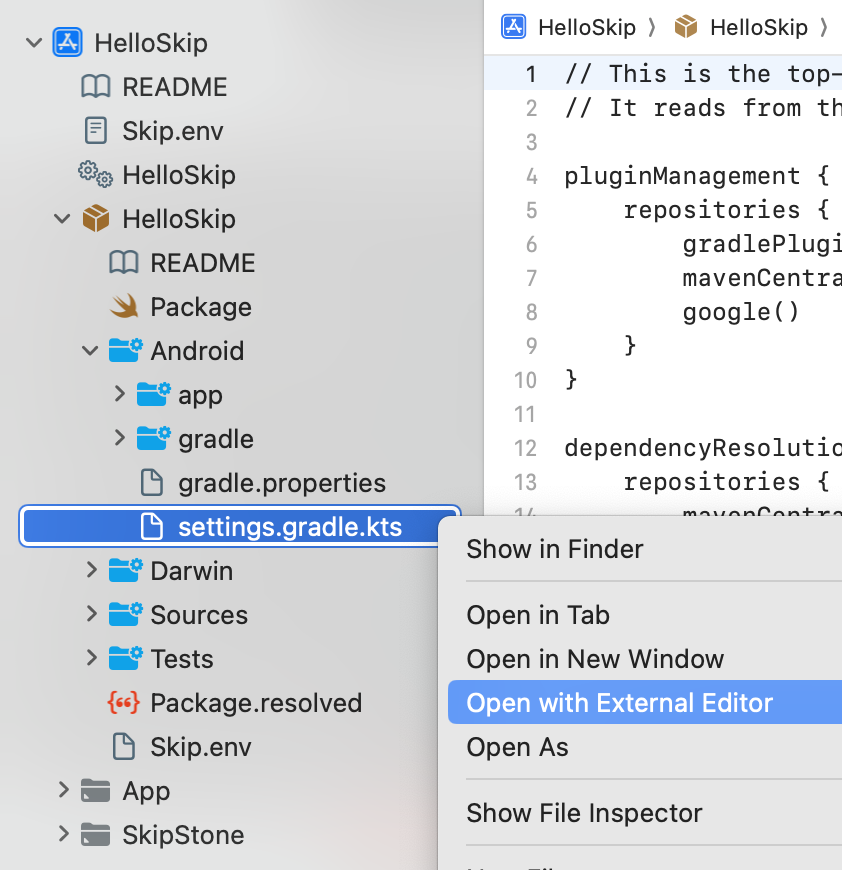
To open your dual-platform Xcode app in Android Studio:
- Control-click the
Android/settings.gradle.ktsfile and selectOpen with External Editorfrom the resulting context menu. - In Android Studio, select
File → Sync Project with Gradle Files
Once your app is open in Android Studio, you can run and debug it from there. Keep in mind that while you can iterate on your app’s custom Kotlin files with Android Studio, any edits you make to transpiled files will get overwritten the next time you update the source Swift.
If you’d like to update your Swift, make the desired edits in Xcode, then rebuild in Android Studio. If you’ve pointed Android Studio at DerivedData as described in the previous section, you can choose to rebuild from Xcode as well.
Attempting to run your app in Android Studio may result in an “SDK not found” error. If you receive this error simply copy your Xcode project’s Android/local.properties file to the path given in the error message.
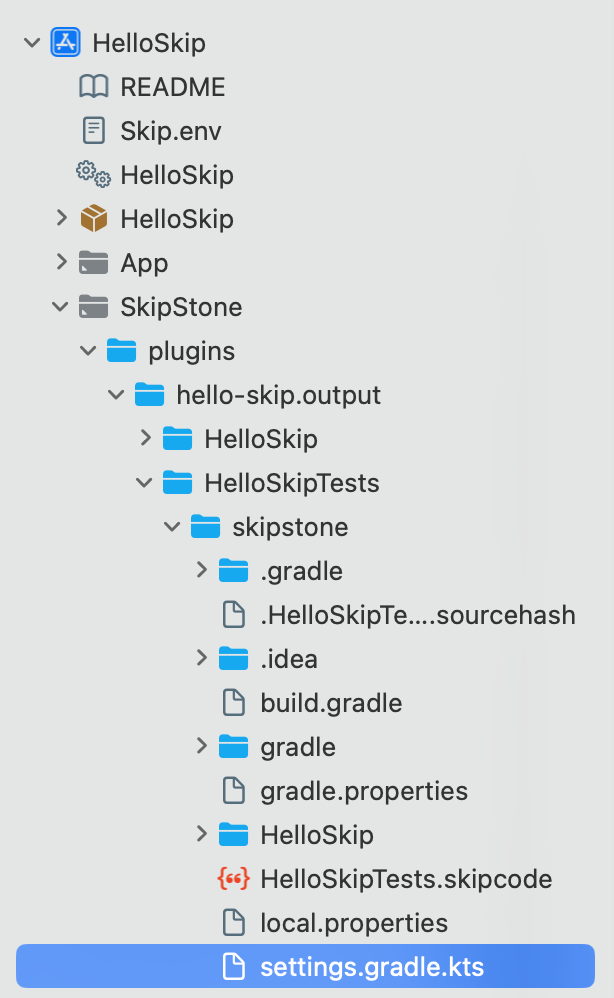
Unit Testing
To run your unit tests in Android Studio, first run them in Xcode so that they get transpiled. Then find your Test module’s output folder within SkipStone/plugins, and use Open with External Editor on its settings.gradle.kts file. Running your unit tests in Android Studio will allow you to use Android’s native debugging tools to debug your tests as well.
Separate iOS and Android Apps
If you’ve created separate iOS and Android apps that share dual-platform frameworks, running your Android app in Android Studio is the same as running any other Android app. See the Getting Started guide for tips on integrating dual-platform frameworks into your Android development workflow.
Frameworks
To open your dual-platform framework in Android Studio:
- Make sure that you have built your project in Xcode.
- Follow the instructions to create the SkipLink Xcode group.
- Control-click the
Android/settings.gradle.ktsfile and selectOpen with External Editorfrom the resulting context menu.
To run your framework unit tests in Android Studio, first run them in Xcode so that they get transpiled. They will then be available in the gradle project. Running your unit tests in Android Studio will allow you to use Android’s native debugging tools to debug your tests as well.